


 Main Menu
- GunLoads Hosted Sites
- Our Goal
-
Welcome to GunLoads.com
 Published on 10-15-2014 12:00 PM Number of Views: 16697
Call them what you will: peep sights, receiver sights, or aperture sights. I will use the terms interchangeably herein for easier reading. However you choose to describe them, you ought to consider trying one on your hunting rifle.
Now, Im sure the purists will want to pick nits and say that each term has a distinct meaning and I wont argue it as there are many different variations on the basic design, but what Im talking about here is looking through a small round hole very close to your eye at a flat-topped post front sight on which sits your target.
Using aperture sights is simple. Pick up the rifle, put the target on the front sight, and press the trigger. The aperture, close to your eye, becomes almost invisible when you look through it, a ghost ring in which your eye automatically centers the front sight. With very little practice, complex motion becomes a learned reflex and you no longer have to think about it. You just do it. Fast. Simple.
How They Work
How they work is a little more complicated, but still not rocket science. The human eye has a lot of things in common with the camera with which we can draw useful parallels, so lets start there. The f-stop on a camera is a variable aperture behind the cameras lens that allows you to regulate the amount and angle of the light that passes through the lens and onto the film or photo-receptor in a digital camera. With the f-stop opened wide, you have little depth of field, and you have to choose what part of the frame will be in focus. Likewise with your eye under normal daylight conditions, you have to focus back and forth to see objects at differing distances clearly. Young eyes can do this almost without effort, and its easy to look from the front to the rear sight to the target, etc. It gets harder and slower as your eyes age, however.
But when you change the cameras f-stop to a smaller-sized opening, you narrow the path of the light, eliminate the peripheral light, and you increase the depth of field. Things both near and far are in focus at the same time. Think about the simplest pinhole cameras. Every single element of the image is in sharp focus, regardless of its relative distance from the camera.
With your shooting eye, this means that by narrowing the available light and increasing the depth of field, you dont have to keep refocusing back and forth between sights and target. Theyre both in focus at the same time. As I said, the older you get, the harder it is and the longer it takes to change focus. The immediate advantages of this are readily apparent.
Theres even a way to make use of this principle with open sights, too. Punch a small round hole in a piece of black electrical tape and stick it on the lens of your shooting or prescription glasses over your shooting eye. Its not magic. Really. It just seems that way when you try it. Merit and other companies make a tiny variable aperture that attaches with a tiny suction cup to the lens of your prescription or shooting glasses: simple, elegant perfection for target shooting.
The fanciest versions of peep sights can be found on match rifles. Target shooters love them for their repeatable micrometer adjustments and because they have the option of screw-in inserts with differing aperture sizes for different ranges and targets. To complement them are a wide variety of matching globe front sights with their own interchangeable reticule-like inserts. Some even have spirit levels for consistent holds. Incredibly precise, theyre much too slow to be of any use hunting, though a fascinating topic to read up on nonetheless.
Using Peep Sights
But this is an article about hunting rifles. While the advantages of putting receiver sights on your hunting rifle are numerous, theyre not for every situation. Here in New Hampshire, most shots we get at deer, bear, or moose are between 25 and 75 yards. The woods are thick, though sometimes you can find yourself in a field or a sizeable clearcut. Still, 150 yards is a really long shot here, but well within the effective range of peep sights. In other parts of the country, hunting in bean fields, prairies, or canyons and shooting at ranges between 200 and 500 yards, dont throw away your scope. At those ranges, youll likely have plenty of time and your quarry probably wont know youre there. Thick cover and fast shots at close ranges arent unique to New England, however, and maybe you can make use of some old Yankee know-how for hunting Texas javelina or Montana mulies. Truth to tell, most anyone who learned how to shoot before scopes grew up and left the target ranges for the hunting fields could teach you more than a few things about them. When they do, you should listen. You can never learn too much about something you enjoy.
So, whats so great about peep sights? Well, to start with, when you use peep sights you get to keep both your eyes open, and retain your depth perception - not the same as depth of field. Im talking about the ability to tell how far away from you something is, which would otherwise be lost if you were using only one eye. Witness the success, variety, and popularity of red-dot optical sights.
Peep sights are extremely fast to use, especially on moving targets, because you dont focus on the rear sight. Just swing the rifle, put the deer on top of the post, and press the trigger. Even with them, you will always be more accurate with as solid a rest as you can find handy, especially for shooting longer distances. But sometimes when youre in the brush and the deer start jumping, you have to snapshoot. The ranges are never long, but you definitely dont have time to be squinting at your sights and trying to focus. I think thats one reason so many hunters climb up the rifle and shoot high when they have to get a shot off quickly in thick cover: trying to see over the blurry buckhorn rear sight that keeps getting in the way of fast target acquisition and tracking. Dont even think about trying to use any kind of a scope in such a situation, the deer will be in the next county before you can get off a shot.
Aperture sights are very accurate, both because they create a longer sight radius mounted on the receiver than traditional barrel-mounted open sights, and because they give you a consistent sight picture for every shot.
They cannot be beat in low light situations. Where youd lose a thinner front sight in shadow, the wide, flat post remains clearly visible. You dont really see the ghost ring, but your eye reflexively centers the top of the post in it. Open rear sights vanish when you enter timber shadows on a sunny day, and it can take anywhere from a few seconds to a minute or more for older eyes to adjust to sudden changes in lighting. In the early morning and late evening, when you can see neither open sights nor unlighted scope reticules, peep sights will give you those precious extra minutes when the game is often on the move.
Once their rifles are sighted in, most hunters will opt to remove the screw-in inserts from their receiver sights for greater visibility and faster speed of target acquisition with the larger hole, and most usually use them with a flat-topped post. A similar system with large holes (minus the inserts) is found on many military rifles, and also on some slug shooting shotguns for much the same reasons.
All of my deer rifles except one, a scout rifle, are equipped with peep sights. My trusty old bolt action Remington 788 in .308 wears a Williams receiver sight with a handmade custom brass front post. My muzzleloader, an older Thompson/Center Renegade with a Green Mountain drop-in barrel in .54 cal. wears one of T/Cs excellent tang-mounted versions. Last, but not least, my cast boolit rig, a T/C Contender Carbine in .30-30 wears a T/C peep sight.
My small game rifle, a Ruger 10/22, wears a Williams sight, too, though it needed to have a taller front sight installed. My local gunsmith found both in Brownells and ordered them for me. This particular front sight has a round gold bead instead of my preferred post, but as its seldom used in low light situations, Im happy with it as it is. No squirrel, raccoon, or woodchuck has ever stopped to complain about it. When I have screwed the small-holed aperture back into the sight, it has easily held its own against anything in its class at local charity and turkey shoots.
One can find other makers of receiver sights, some still in production, while others are a gun show only find. Some names that come to mind besides Williams and T/C are Lyman, Winchester, Redfield, and Marbles. Im sure there are more, too.
One company, NECG (New England Custom Gun Services), now makes emergency peep sights that mount easily onto Weaver or Ruger scope bases.
Not so many new rifles today come already drilled and tapped for them from the factory, but most older used rifles are. At one time, such sights were factory options on many single shot and lever action rifles, and there were numerous aftermarket tang-mounted fold-down post sights available. Even if your current rifle isnt drilled and tapped, its a simple and inexpensive job for your local gunsmith, and its even a reasonably easy project with the right jig for the amateur. Its a good excuse for a pleasant hour or two of wandering through the Brownells catalog looking at tools and sights, either way.
Practice, Practice, Practice
Now, when youve got the sight properly mounted onto your rifle, remember that there is a little more to it than just sighting it in from the bench and heading off into the woods. If youve done much shooting of military rifles like M1 Carbines, Garands, AR-15/M-16s, etc., it wont take much to get comfortable with the system. But if you havent, do get yourself down to the range and practice: offhand, sitting, and making use of natural rests.
You really need to be shooting at least a box of ammo each range session, and more is better. Weekly visits to the range for several months before hunting season isnt at all excessive, no matter what kind of sights are on your rifle. The truth is, most hunters are not target shooters and very few hunters practice anywhere near enough to shoot at their own potential, never mind that of their trusty rifle. Ask yourself this: What is the maximum distance you can put five rounds offhand into an eight inch circle (the size of a deers kill zone, the pieplate test) with your deer rifle? Can you do it at 200 yards? 100 yards? Only 50 yards? An honest appraisal of our own skills at the range is often enough to convince us of our need for more practice.
Shooting off the bench makes for smaller groups, but doing only bench shooting wont help you at all in the field. I will admit that certain knowledge of what your rifle and load is capable of doing can boost your confidence, but there is no substitute for regular practice from a variety of positions. Usually, one shot is all youll get, so you have to do it right the first time. Lots of realistic practice will help you make that one shot count. Ranges with running game targets are almost as rare as Bigfoot, but if you have one near you, by all means go for it. Taping targets to old tires and rolling them down a hill and other similarly creative ideas will work, too, if you give some careful thought to how you can do it safely. Shooting at reactive targets, metal gongs, or silhouettes at random distances can be fun, too turn your back while a friend moves them around, then when youre told its safe, turn and shoot at them.
Dont forget about your .22! In fact, it should be the first rifle for you to try peep sights on. The ammos much cheaper, its lots of fun, and youll shoot it a lot more. Then, when youve gotten comfortable shooting it on the range, take it out after some speedy little red squirrels to get ready for deer or bear season. When you can hit one of the little buggers at 50 yards, a deer at 100 looks huge and easy to hit. It shouldnt take very long for you to see the light and put a set on your big game rig, too. You wont regret it.
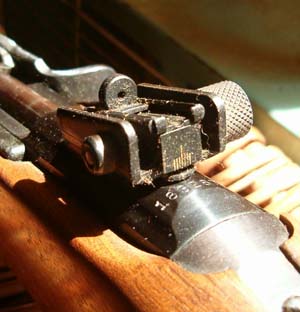
001 The M1 Carbine rear sight is very rugged and fully adjustable.

002 The M1 Carbine front sight post is protected by two steel wings.
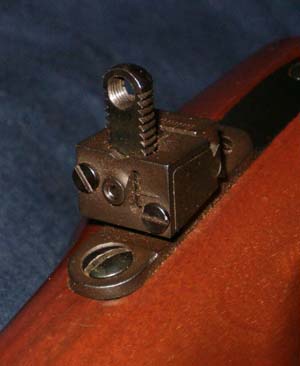
003 This is Thompson/Centers tang-mounted rear sight on a Renegade muzzle loader.
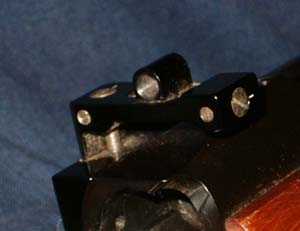
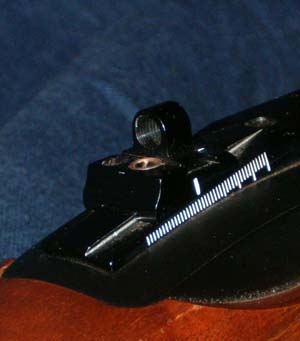
004 Williams FP sight on a Remington 788 action.
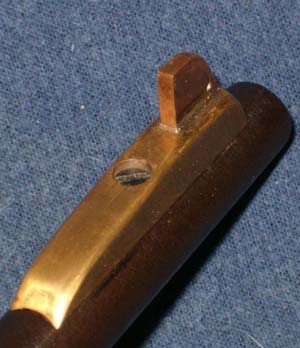
005 A custom brass front post sits atop this Remington barrel.
006 Williams GRS on a Ruger 10/22 action.
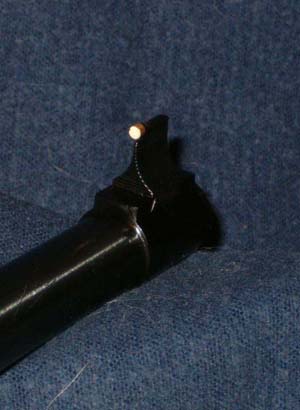
007 Matching Williams front sight on a Ruger 10/22 barrel.
Published on 10-15-2014 11:34 AM Number of Views: 2254I am just throwing out some thoughts on the subject. Really it's pure conjecture and I am really very excited about the Scientific results and conclusions that we have derived.
We just may have revolutionized and changed industry standards since 1905"; "making the flat base bullet obsolete"; or at least questioning it. We (NwCP) are at the forefront of revolutionizing the handgun bullet. "sub-sonic velocities", that's were most handguns are and operate (below the speed of sound). Please note the turbulence from "cursory fluid dynamics analysis" photos and note the lack of turbulence behind the bullet of the RBT as opposed to the drag caused by the flat base bullet.
Science has now proven that the base of the bullet is MORE important than the nose of the bullet at handgun velocities. This is what allows the increased penetration and accuracy.
Now I have "Scientific" proof!!!
Here are the NwCP Boat-tail measured BC's and related data and cursory fluid dynamics analysis photos.
All projectiles measured at a velocity range of 925-800fps. Testing was done through a tandem six screen chronograph (Slide 1) at ranges of 3 to 100 yards. The deceleration data and resulting drag data was checked by placing onion skin paper on the chronograph frames. By comparing bore line with actual bullet drop, the drag function could be checked. The test firearm is a Thompson Contender, in .45 Colt, barrel clamped to a rigid bench. Trigger actuation was remote hydraulic and all loads were with Blue Dot powder, Starline cases and Federal Large Pistol primers. NwCP projectiles were compared to the Hornady 300 grain XTP, Hornady 300 grain SST, and Speer 260 grain JHP. These bullets were selected because they represent some of the best bullets in their class. Some bullets tested were excluded from test results, because of lack of quality or lack of specific gravity..
A second experiment was conducted to determine the depth of penetration in water. This test was conducted by simply firing the various projectiles into an twelve foot water trough (Slide 2) and measuring the distance traveled.
Results:
Temp 48°F
Elevation 2500 ft
Barometric Pressure 30.00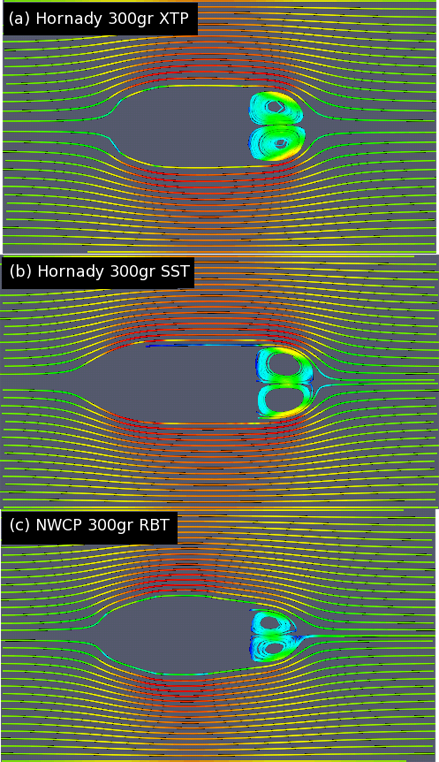
Table 1
Projectile
G1 Ballistic Coefficient (800-900fps)
NWCP .452 260gr. Rebated Boat Tail
.200±.002 lb/in2 n=5
NWCP .452 300gr. Rebated Boat Tail
.265±.001 lb/in2 n=5
Speer .452 260gr. JHP
.173±.001 lb/in2 n=5 (.171 reported by Speer)a
Hornady .452 300gr. XTP
.194±.002 lb/in2 n=5 (.200 reported by Hornady)a
Hornady .453 300gr. SST
.248±.004lb/in2 n=5 (.250 reported by Hornady)a
a The ballistic coefficients provided by Speer and Hornady are not necessarily G1.
Projectile
Penetration in Water (1000 fps)b
NwCP .452 260gr. Rebated Boat Tail
78.7±2.4 inches n=8
NwCP .452 300gr. Rebated Boat Tail
92.1±3.1 inches n=8
Speer .452 260gr. JHP
50.0±5.3 inches n=15
Hornady .452 300gr. XTP
70.6±2.4 inches n=8c
Hornady .453 300gr. SST
79.5±4.3 inches n=8
bThese are normalized impact velocities.
cThe Hornady XTP did expand a small amount at this impact velocity, decreasing its penetration.
Note: NwCP 260 grain vs Hornady SST 300 grain inches of penetration in water.
Note: NwCP 260 grain B.C. vs Hornady 300 grain XTP B.C.
Conclusions:
The lower drag observed with the NwCP RBBT bullets provides for a higher ballistic coefficient and less measured drop as compared to more traditional handgun bullets. In some cases these differences are large (Table 1). The .45 caliber 300 grain NwCP RBBT G1 coefficient is 25+% higher than the .45 caliber Hornady XTP and 6% higher than the Hornady SST. The 260 grain NwCP RBBT G1 coefficient is 13% higher than the Speer 260 grain JHP. In addition, these bullets provide this ballistic advantage without the need for a sharp bullet point, which would limit their use in tubular magazines.
Along the same lines as the air-drag measurements, the water penetration measurements further display the streamline nature of the rebated boat tail design at handgun velocities. The .45 caliber 300 grain NwCP RBBT penetrated an incredible 92 inches of water at an impact velocity of 1000 fps. This is a full 12 inches (13%) further than the pointed Hornady SST at the same impact velocity. It should be noted here that the Hornady XTP did begin expansion at these velocities and this did likely limit its penetration. The 260 grain NwCP RBBT also performed exceptionally well with a penetration of nearly 79 inches; a full 36% further than the Speer 260 grain.
To further explain the mechanics of these observations, we have provided a cursory fluid dynamics analysis of three of the bullet forms at a simulated 1000 fps velocity. Slide 3 shows a comparison streamline plot of the Hornady 300 grain XTP (plot a), Hornady 300 grain SST (plot b), and the NwCP 300 grain RBBT (plot c). Upon visual inspection of the three plots, one can make two important observations. First of all, one can see the reduced turbulence at the base of the NwCP RBBT design compared to the other two bullets. Second, it is apparent that at these velocities, the nose profile makes little difference.
Table 2
Projectile
G1
Calculated Drag
300 grain NwCP RBBT
.265
0
300 grain Hornady SST
.250 (+5%)
+4%
300 grain Hornady XTP
.200 (+25%)
+40%
Calculated drag coefficients, from the fluid dynamics analysis, match with the experimental G1 values (Table 2). The NwCP RBBT design is predicted by the fluid dynamics analysis to have a drag roughly 4% better than the pointed Hornady SST design at these velocities. The experimental value was determined to be 5%. The NwCP RBBT design is predicted to have a 40% advantage over the Hornady XTP of the same weight by the fluid dynamics analysis. The experimental G1 difference was determined to be 25%. This may seem like a discrepancy; however one must remember that the experimental values are G1 ballistic coefficients that do not model the behavior of the XTP design very well. This is an important note, because it further supports the use of fluid dynamics over arbitrary ballistic coefficients.
The moral of this story is: at sub-sonic velocities the handgun bullets' base has a great deal more importance than the nose of the bullet in reference to accuracy, B.C. and penetration, PERIOD!!!!!!
The most important thing to remember about a bullet base or any flat surface is the bigger the base, the bigger the vortex it will create. An example of this is: lay two sheets of plywood on top of each other, then try and pick up the top one with out picking up the bottom. It takes a lot of effort and eventually the bottom one breaks free. Now do the same thing with the plywood sheet turned on its edge; they separate easily. This same theory applies to the base of a bullet. The bigger it is, the more it tries to pull everything with it. The smaller the base is, the better it goes through things. This is why my little football bullet works so well!
© Copyright 2008 Robert R Sauter (NwCP)
All rights reserved,including the right to reproduce this article or any part thereof in any form or by any means,electronic or mechanical,including photo-copying,recording, or by any information storage and retrieval system, without permission in writing from NwCP..
Thanks,
Robert R. Sauter (AKA Bullet Bob...)
406-723-8683 (anytime)Specialty Projectiles for Small Arms
Custom Produced by:
Northwest Custom Projectile
Robert R. Sauter (AKA BULLET BOB)
P.O. Box 127
Butte,Montana 59703
406-723-8683
http://www.customprojectile.comIndependent testing was done by:
Buchanan Ammunition Company, Inc.
1535B Crockett Ridge
Coeburn, VA 24230
(276)-395-3975 TEL
http://www.buckammo.comFluid Dynamics Analysis
DSB Scientific Consulting
616 Finch Ct., Lugoff, SC 29078
(803)-408-2729 TEL
© DSB Scientific Consulting 2008© Copyright 2008 Robert R Sauter Permission has been granted to GunLoads.com for display of this article.
Published on 10-15-2014 08:38 AM Number of Views: 14392Reviews submitted by members of Gun Loads.
Would you like to have your story published and viewed by people from all over the world? Well... You can! This section of Gun Loads is to provide the members here a place to show off their writing talent and talk about something that is related to what we do. This can be shooting, hunting, just about anything outdoor related. Thanks and enjoy
Reviewer Title Product Date Jim A Berndt Barnes Reloading Manual Number 4 Barnes Reloading Manual Number 4 9/15/08 Robert R. Sauter Boattail Handgun Bullets Boattail Handgun Bullets 8/17/08 Jim A Berndt Transition from Rimfire to High-Power Hammond Game Getter 6/23/08 Versifier Peep Sights For Hunting Rifles Peep Sights For Hunting Rifles 7/29/07 El Oso Hoppe's Elite Bore Cleaner Hoppe's Elite Bore Cleaner 4/13/2006 Jim Berndt Reduced Loads Without Reloading Hammond Game Getter 4/6/2006 Capt Walt Fluid Film Fluid Film 2/7/2006 Capt Walt Henry Big Boy .44 Mag Henry Big Boy .44 Mag 12/21/2005 Fred K. Aron Ruger Super Blackhawk 4 5/8th Ruger Super Blackhawk 4 5/8th 6/3/2005 Published on 10-15-2014 08:21 AM Number of Views: 11489Web Site: http://www.ballistictec.com/
Writer:Willy Snyder
Date: July 19th, 2005
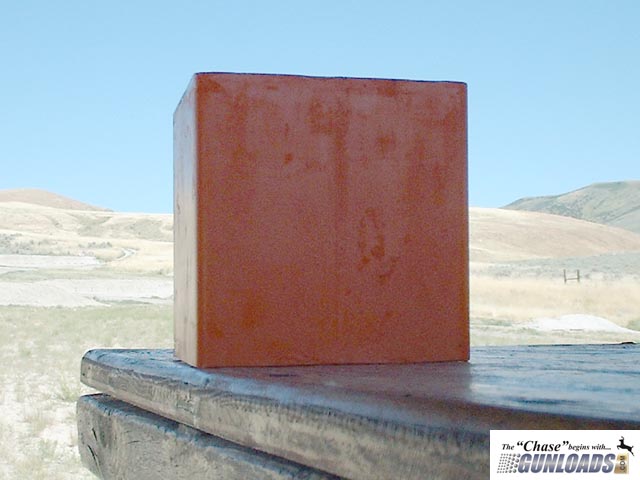
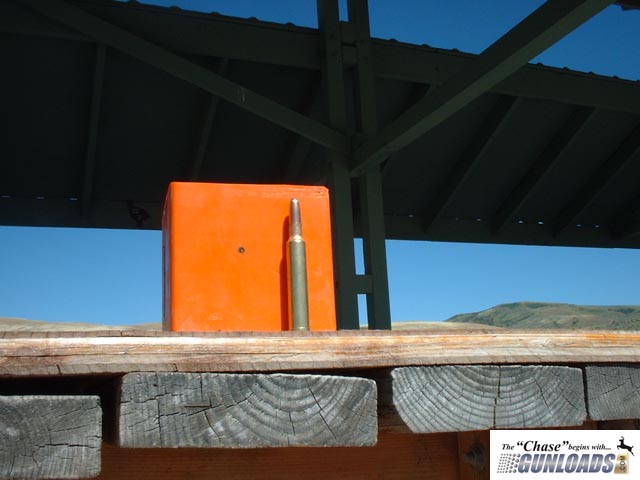
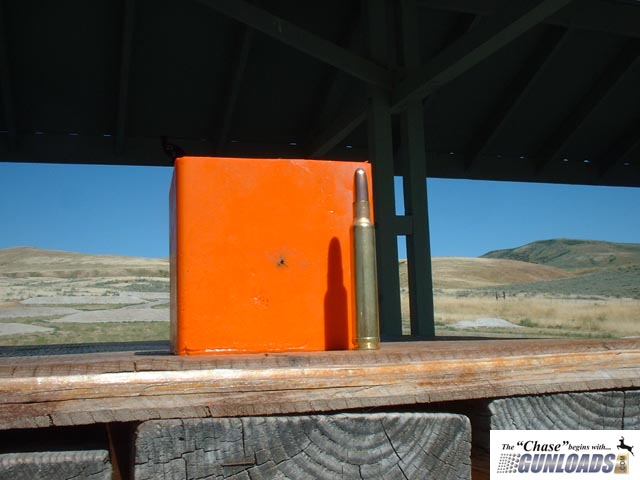
BackgroundThe Sniper Training Cube is a 4" x 4" x 4" solid block of Ballistic Polymer manufactured by Ballistic Technologies. It's said that they can take any caliber from a .17HMR to a .50BMG at point blank range. A rough estimate would say that it's about 3 pounds. It's also suppose to react violently and unpredictable after being hit giving you the effect of having to shoot it at different angles, different and changing yardages, and under different circumstances. We found this out after shooting it at 180 meters and it dipped down into a small pit where we overshot it. (As you will see in one of our videos) So without further ado, lets get started. Click to EnlargeTest Shot 1Our first shot we did was at 25 yards shooting a 300 Weatherby with a 180 Grain Sierra Round Nose bullet using 83 grains of R25. This shot right through it with a very small entrance wound of about 1/4 inch and even smaller exit wound with about 1/8 inch but was cracked. (As the pictures will show) The block jumped back about 5 yards after being struck, but took the bullet very well.Entrance
 Click to EnlargeExit
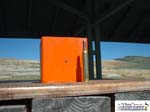 Click to EnlargeVideo
Test Shot 2Our second shot was using a Winchester .270 with a Nosler 130 Grain Ballistic Tip. This went right through the block just as the Weatherby did. The only difference was the size of the entrance and exit holes. The entrance hole was about 1/8 of an inch whereas the exit hole was about 1/4 of an inch. The cube got knocked back about 5 yards as well.Entrance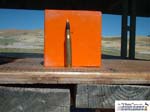 Click to EnlargeExit
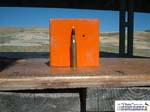 Click to EnlargeVideo
Test Shot 3Ok, time for a real test. For our test shot 3 we pulled out the 12 gauge and loaded up a 1oz Winchester Rifled HP slug. We setup the block about 20-25 feet away just in case we had any backlash, and to see if anything would come back for our later point blank test. After shooting, it finally came to a rest about 10 yards from where it was shot. Surprisingly, nothing came back on us after plowing it dead center and even more surprising was the fact that all there was; was a 3/4 inch hole going in and nothing coming back out. It took this test very well.Entrance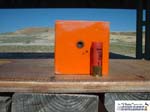 Click to EnlargeExitNo ExitVideo
Point Blank TestOk, so we know it can take a 1oz slug at 20-25 feet away. Lets try another slug at about 4 feet away. (video shows this). Well we fired it off and it landed about 15 yards away again with no exit hole. Obviously these bullets had to mushroom out pretty good in there. We decided, since we were already setup to go, lets try another point blank shot with some 3 inch BB (Double B) shot. We fired this one off and it flew about 15 yards as well, but the entrance hole was found rather quickly. It blew close to a 1 1/4 inch hole going inside and speckled the outside with pellets. (See the Entrance picture below) We figured 1 shot of point blank BB shot was enough. It caused some good damage, and we have some reasoning to think it hit the two mushroomed slugs inside and cause some extensive internal damage (as later pictures show)Entrance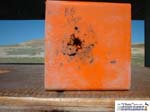 Click to EnlargeExitNo ExitVideo
Reaction Close RangeOk, we saw what some various calibers can do to this guy, now lets test some reaction to this cube at about 30 yards shooting it multiple times. As you can see in the video there was some reaction, but nothing too spectacular. Although, (and remember the video camera is not looking through the scope) it did bring on some interesting results as it was shot backwards. With the tall grass, it actually hid behind the grass so much as you could only see a small part of orange and had to shoot accordingly. This was shot using the .300 Weatherby.EntranceNo ImageExitNo ImageVideo
Reaction From a DistanceWe tested the reaction again from about 180 meters which brought on some fun results. I shot three times, the first time it shot backwards a bit, the second time it shot up in the air, rolled back, and actually fell into a small pit with some grass covering it up. The third shot (and I hate to admit it, but I will) I missed and shot over it. This was really an exciting experience shooting the cube from this far and watching where it landed. I only shot three times at this point, but I could imagine by shooting more rounds this thing could end up just about anywhere.EntranceNo ImageExitNo ImageVideo
After All The ShotsAfter we got done, and counting up the shots, here is what we shot.Weapon Times Bullet Type Bullet Type 12 Gauge Shotgun 7 1oz Rifled HP Slug BB (Double B) Shot .270 Winchester 17 130 Gr Nosler Ballistic Tip 130 Spitzer Boat Tail .300 Weatherby 11 180 Gr Sierra RN 180 Gr Core-Lokt (Factory) Entrance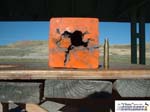 Click to EnlargeNo ImageVideo
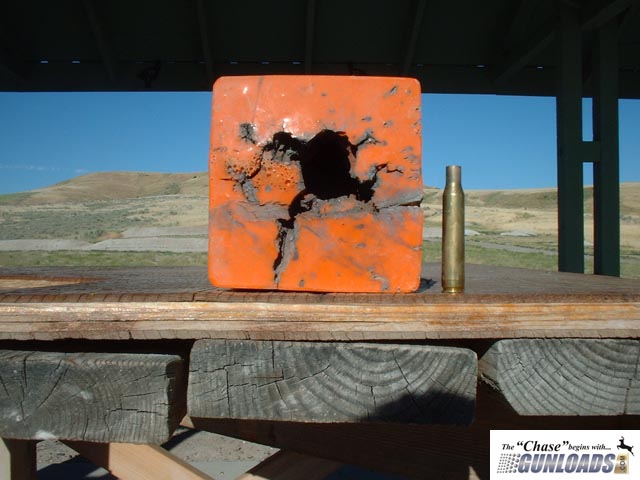
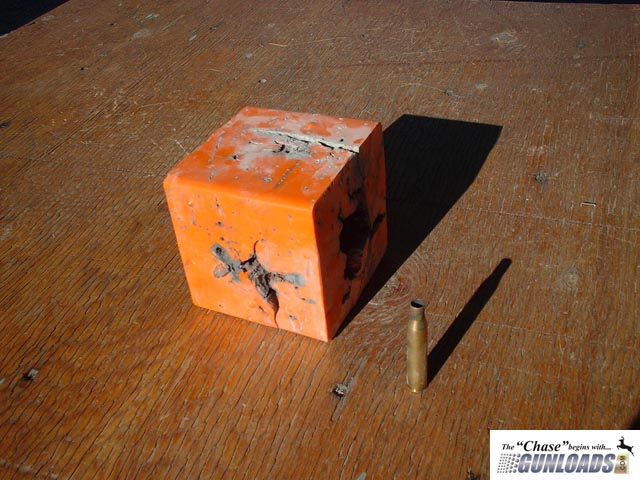
In ConclusionThe GoodIt was very fun to shoot this cube at a distance and watch it's reaction to various calibers and see what happens. By clipping the side or shooting low it would advance the cube in all different directions and sometimes even hide behind some grass or a spot of sagebrush, which you would have to watch or look close to be able to get a shot. A great tool for snipers who need this sort of practice. Also a great target for those varmint hunters who want to learn to adjust for various yardages as well. With it's orange color it also makes it easier to see at greater distances.The BadWe fired 35 high caliber rounds at this cube and it did come out pretty badly damaged with a large hole (above image) on one side that goes in almost 3 inches. Along with other large holes on the other exterior sides. Also, as mentioned earlier I think a large part of that hole was due to re-hitting the mushroomed slug inside and causing some explosive action inside. This was one days shooting and I think given more ammunition this block will split apart and become inoperable. Which we intend to do and give an update. Also, because of it's size (4" x 4") it would make it very hard to shoot in places of tall grass or sagebrush without propping it up first.Misc. Photo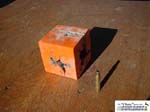 Click to EnlargeMisc. Photo
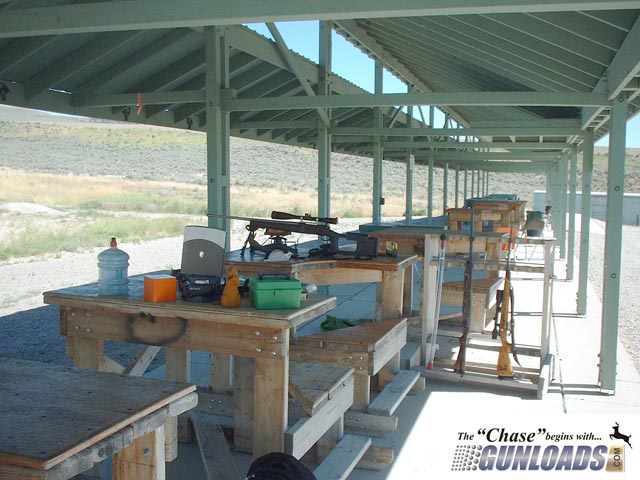
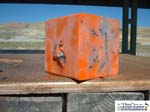 Click to EnlargeRange
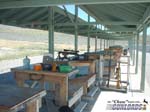 Click to EnlargeBullets
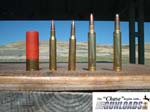 Click to EnlargeSpecial ThanksI would like to thank everyone who read this review and found it insightful. I hope you enjoyed reading it as much as I enjoyed shooting it. I would also like to especially thank the people at "Just Shoot Me Products" for allowing me to shoot their fine targets and give a review.Published on 10-14-2014 08:03 PM Number of Views: 11451
Web Site: http://www.ballistictec.com
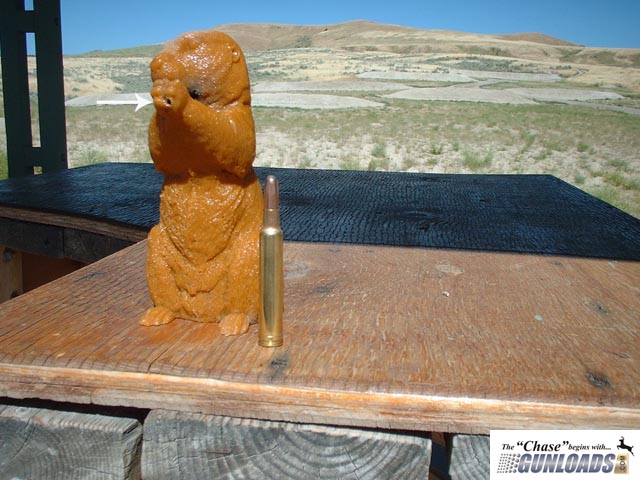
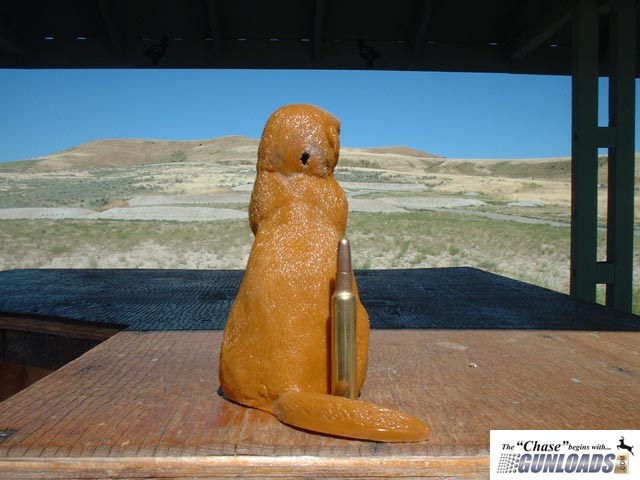
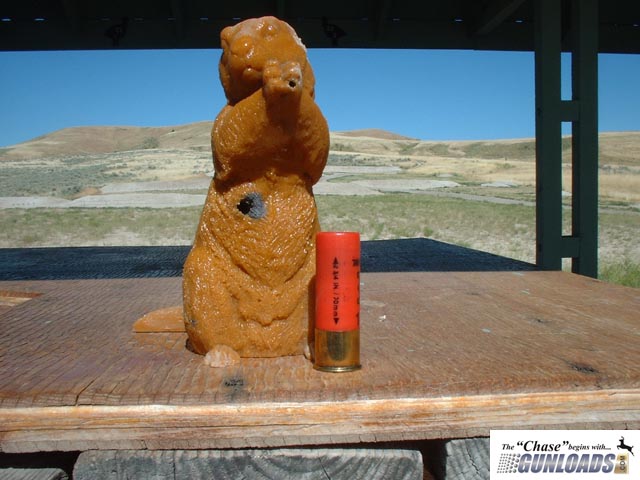
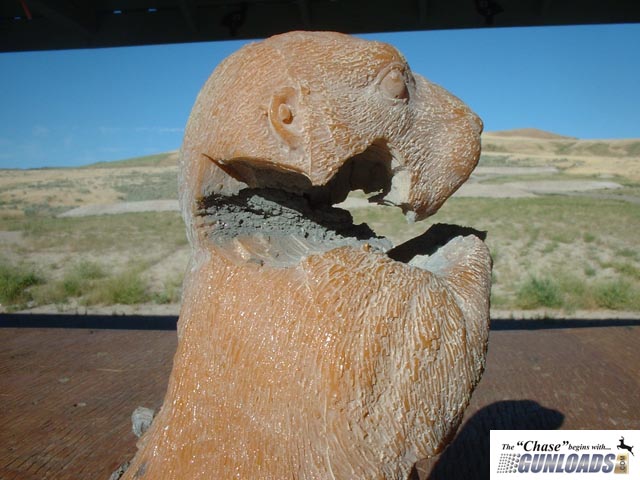
Writer: Willy Snyder
Date: 7/24/2005BackgroundI'm back with my second review. This time we were able to test the ballistic polymer prairie dog. The prairie dog itself is about 7 inches tall weighing a little over one pound. It's made out of the same material as the ballistic sniper cube which we tested the same day, and this little dog is still suppose to take any caliber, any projectile from any distance. I do have to start off with saying that the detail in this prairie dog is very nice. It looks like it has fur with detailed eyes, ears, face, and a 3 1/2 inch tail. So, off we go.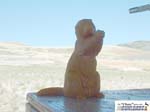 Click to EnlargeTest Shot 1Our first shot we did was at 25 yards shooting a 300 Weatherby with a 180 Grain Sierra Round Nose bullet using 83 grains of R25. It entered the dog through the hands and exited out the back of his head. The entrance hole was about 1/8th of an inch, but the exit hole was about 1/4 of an inch. It blew out a surprisingly large hole out the back of it's head. In tests done with the sniper cube, the exit and entrance holes were roughly the same diameter. Maybe this was just a fluke, since there was a gap between his hands and his neck, (as the pictures show) the bullet might have expanded and gone into the neck larger, thus blowing more out. We were not really sure why it blew out so much more at this point, so we went on.Entrance
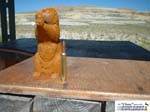 Click to EnlargeExit
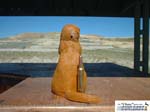 Click to EnlargeVideo
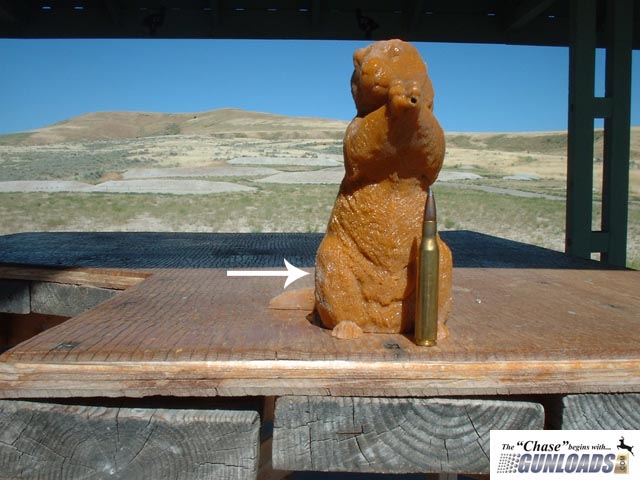
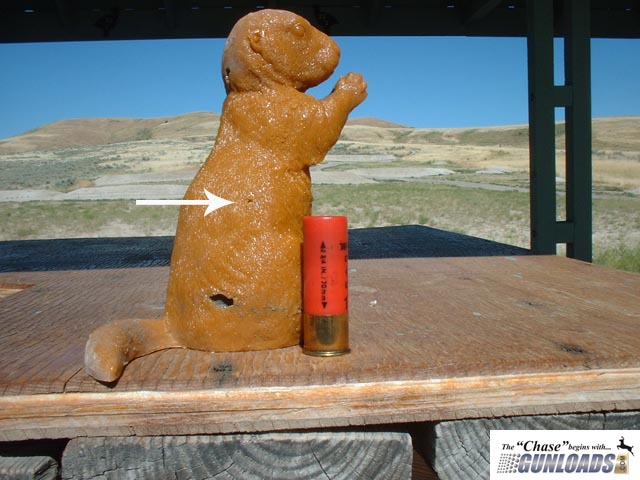
Test Shot 2Our second shot was using a Winchester .270 with a Nosler 130 Grain Ballistic Tip at 25 yards as well. We were using a fairly hot load and it was a bit sporadic. We wanted to place a shot directly into the belly, but it went to the left and shot him in the side. Entrance hole was very minimal not even an 1/8th of an inch. But the exit hole measured exactly 1/2 inch. It almost seemed that this prairie dog was a bit harder causing a larger throughput expansion thus causing a larger exit wound. The material just did not want to close the gap behind the bullet.Entrance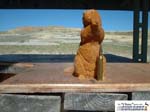 Click to EnlargeExit
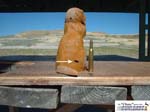 Click to EnlargeVideo
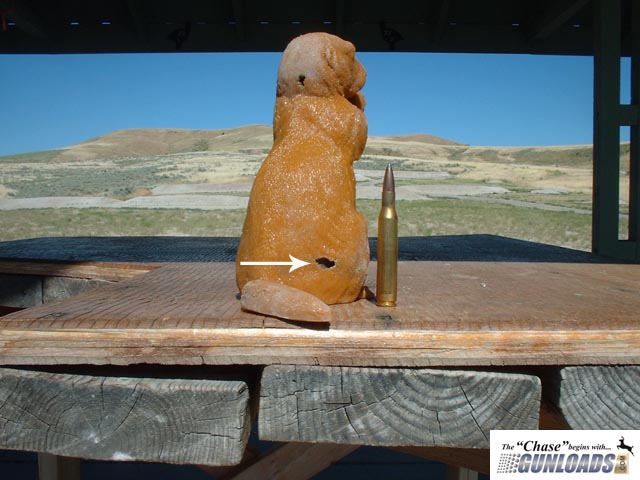
Test Shot 3Well, we were a bit scared for the prairie dog for this test. Shooting a 12 gauge 1oz HP slug into the animal from about 15 feet away. After seeing the exit wounds on these other two calibers, we though for sure a slug would blow a large hole out the back of the dog. But, we were wrong. We shot him into his right side and he spun around and jumped all over the place until he finally landed about 15 yards away. The entrance hole was a little under 1/2 inch and there was NO exit hole! Although it was slightly cracked where the slug should have exited. The slug only had about an inch and a half until exiting, but it stayed in. The little prairie dog took it, and quite good too.Entrance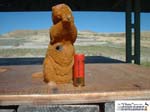 Click to EnlargeExit
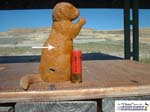 Click to EnlargeVideo
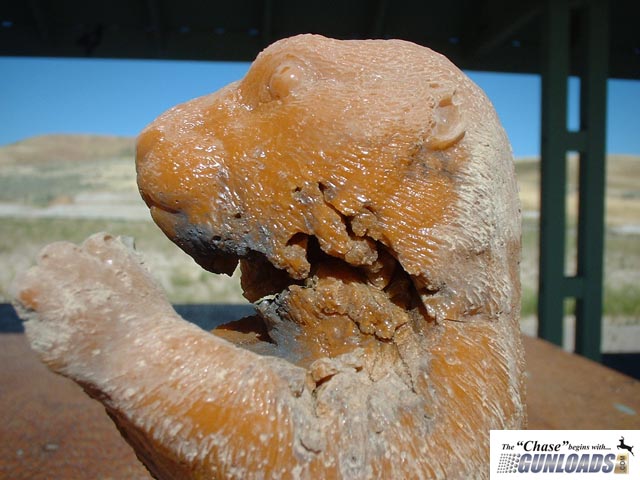
Point Blank TestWell, it's time to see what kind of beating a shotgun slug will do to the prairie dog at point blank range. We loaded up the same type of shotgun slug used in our last test and shot it right in the hands. It blew one hand off completely and half of the other one and took a large piece of his neck with it. If you remember from Test Shot 1, this is about the same place the .300 weatherby hit it, so the smaller hole was already there, and probably helped the slug go through easier.Entrance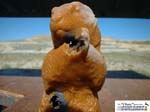 Click to EnlargeExit
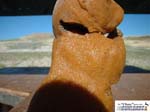 Click to EnlargeVideo
Point Blank Test 2We really liked that point blank test with the slug to the neck, and though we might as well give it one more try. This time we used a 12 gauge 3 inch BB (Double B) shot directly to the neck. It took the hit very good with minimal damage.Entrance Click to EnlargeNo ImageVideo
From a DistanceWell, we tested the dog against some various shots. Now lets see how fun it shoots from a distance. We setup the prairie dog about 195 meters away on a small rock hill and took a shot. This was really neat to look through the 6 x 18 scope and see this little guy sitting atop this hill. I actually shot high the first round, and the second round I got him low.EntranceNo ImageExitNo ImageVideo
After All The ShotsAfter we got done, and counting up the shots, here is what we shot.Weapon Times Bullet Type Bullet Type 12 Gauge Shotgun 7 1oz Rifled HP Slug BB (Double B) Shot .270 Winchester 9 130 Gr Nosler Ballistic Tip 130 Spitzer Boat Tail .300 Weatherby 8 180 Gr Sierra RN 180 Gr Core-Lokt (Factory) Front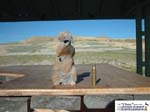 Click to EnlargeBack
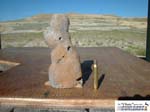 Click to EnlargeVideo
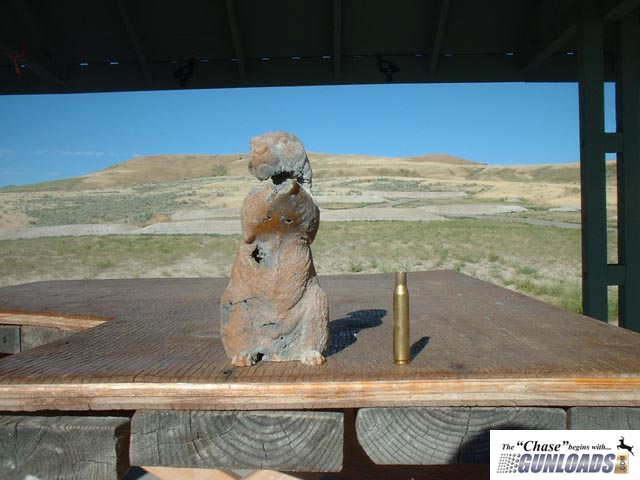
In ConclusionThe GoodThis little guy was a riot to shoot. The detail on him was great and you could really make out what he was from a distance through a scope. You could really practice your long range varmint shooting with this. In one instance we buried him half way down so only the top half was showing and shot him to get the feel of one standing in a hole. Overall very exciting and we really had a great time with this.The BadThe hog itself didn't seem to close very good after the shots like I thought the polymer would do. The bullets exited the hog with large wounds, and we only shot 24 rounds through this guy and his neck is more than half way gone. The first shot on the tail almost ripped it completely off, and the second shot took the tail clean off. We shot the hog about 4 times with the .270 and .300 about an inch from the ground and it blew a pretty large hole out the backend. (You can see from the picture above called "Back"). We intend to shoot many more rounds through him and give some updated pictures as time progresses.Neck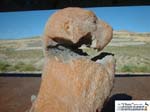 Click to EnlargeRangeClick to EnlargeBulletsClick to EnlargeSpecial ThanksI would like to thank everyone who read this review and found it insightful. I hope you enjoyed reading it as much as I enjoyed shooting it. I would also like to especially thank the people at "Just Shoot Me Products" for allowing me to shoot their fine targets and give a review.Published on 10-14-2014 07:59 PM Number of Views: 11175
The New XD 45ACP review coming soon.
Published on 10-14-2014 07:57 PM Number of Views: 10657Reviews written and created by Gunloads.com StaffWe here at Gunloads.com began a new reviews section designed and written by only our staff. These reviews consist of factual non-bios articles of how we see the products. These reviews contain articles, pictures, and possibly a video of the tested product. If you have a product you would like tested and reviewed by our staff, please use the Contact Us link at the bottom or you can e-mail us direct at reviews@gunloads.com. As a company, you will also get FREE top page advertisement on our site for our specified time frame.
Our movies are designed to work with either Quicktime or Windows Media Player. If you have any problems viewing the movies or have any questions or concerns about the reviews, please contact us at reviews@gunloads.com.
We will test anything related to hunting, shooting, combat, tactical, and everything in between. Such as guns, ammo, scopes, weapon accessories, knives, night vision, targets, etc.
Reviewer Product Website Rating Category Willy Snyder
Coming SoonSpringfield Armory XD 45 ACP 
http://springfield-armory.com 9/10 Guns Willy Snyder
July 24th, 2005Prairie Dog 
http://www.ballistictec.com 8/10 Targets Willy Snyder
July 19th, 2005Sniper Training Cube 
http://www.ballistictec.com 8/10 Targets
 Last 5 Loads
- Old Articles


| BP | Bronze Point | IMR | Improved Military Rifle | PTD | Pointed |
| BR | Bench Rest | M | Magnum | RN | Round Nose |
| BT | Boat Tail | PL | Power-Lokt | SP | Soft Point |
| C | Compressed Charge | PR | Primer | SPCL | Soft Point "Core-Lokt" |
| HP | Hollow Point | PSPCL | Pointed Soft Point "Core Lokt" | C.O.L. | Cartridge Overall Length |
| PSP | Pointed Soft Point | Spz | Spitzer Point | SBT | Spitzer Boat Tail |
| LRN | Lead Round Nose | LWC | Lead Wad Cutter | LSWC | Lead Semi Wad Cutter |
| GC | Gas Check |