Inline FabricationRotoMetals2Snyders JerkyWideners
Reloading EverythingLoad DataRepackboxTitan Reloading
MidSouth Shooters Supply Lee Precision
Page 3 of 8 FirstFirst 12345678 LastLast
Results 41 to 60 of 148

Thread: Consistency applied.

  1. #41
    Boolit Grand Master

    MBTcustom's Avatar
    Join Date
    Feb 2011
    Location
    Arkansas
    Posts
    6,994
    OK, so back to consistency.
    I want to take a minute and talk about a tool I have just started using a few months ago. That would be the NOE mold block thermometer.
    Attachment 131921
    I got this neat little unit from NOE bullet molds.
    When I first started using it, I really couldn't tell that it was much use at all for telling me where to run my molds temperature. It turns out, I absolutely did not understand how this tool was to be used!
    I decided to give it another shot, now that I have my process dialed into perfection using the bell curves as a training aid. I just plugged it in, and started observing what the thermometer would tell me. At first, there really wasn't much to see. The temperature would dip down about 5 degrees when the mold was shot full of alloy, and then it would raise five degrees after I dropped my bullets (there's a lag time between when you fill the mold and when that heat flows down to the probe in the bottom of the mold.)
    No great shakes, I saw nothing really exciting. Until I needed a break and I put my mold back on the hotplate.
    When I returned from whatever I was doing 15-20 minutes later, I saw that the temperature had dropped about 25 degrees low. "Huh. Interesting." I thought. "lets see how many pours it takes to get back up to the right temperature running at my normal cadence."
    10-15 cycles later, it was finally back up to temperature.
    "Interesting" I thought.
    The next time, I turned my hot plate up higher by a little bit (just guessing).
    When I returned from my break, the mold was 25 degrees hotter than when I left it.
    "Huh." I thought. "lets see how many pours it takes to get back down to where it's supposed to be this time".
    3-4 cycles later, I was back where I needed to be.
    "Interesting." I thought.
    I went along my merry way then casting along just as easy as you please, and then the phone rang. I answered it and stuck in my earbuds real quick and tried to do like Mrs. goodsteel and carry on a conversation while I was working. Unfortunately, I am not gifted with the ability to multitask like my beloved counterpart and I ended up missing a few cycles and the mold got cool. It took nearly 10 cycles to bring that mold up to temperature, jacking with the dwell time, and trying to control the sprue freeze time and talk about gunsmithing all at once!!!!
    I ended up putting the mold back on the hotplate, and I was glad I dropped all those bullets on the bench while I was trying to get my mold back up to temperature.
    When I picked it up off the hotplate, it was back about 20 degrees hotter than it should have been, and I was quickly back in business.

    The moral of the story is a very important lesson that you can use even if you don't have all the fancy gadgetry that I have:
    When you set you hot plate, just make sure that it is set hotter than it needs to be. When you start casting, just jump right into your preferred cadence and stick to it like glue, and drop the first 5 fills on the bench, or in your sprue pan or what have you, then just start dropping them in the bucket as if you had been doing so all along.
    If at any point, you mess up, and suspect that your mold got cool, remember that pouring bullets will waste more time and alloy in the long run, than if you had just taken the opportunity to set the mold aside and stretch for a minute or ten.

    Also, I want to tell you about a trick that I got from our very own Lars45 last time I was out at his place. I told him I have always had trouble getting dinged up bullets when I water drop, because they hit each other under water. I have tried the rag over the bucket with a hole cut in it, but that's a PITB, and I always end up using the rag for wiping a machine down or something when the pot is not in use. Also, I still get dinged up bullets when I use that method.
    He told me to try floating sponges on top of the water and try to hit them with the bullets when I drop.
    Fortunately for me, mrs.goodsteel had just recently bought a package of six dish sponges and I took the liberty of commandeering them for the cause (well almost six, shes getting smart, and had hidden one from me. LOL!)
    Attachment 131922
    This worked absolutely perfect. The bullets came out cleaner and prettier than ever, with nary a ding one.
    Really good trick!!!
    Last edited by MBTcustom; 02-23-2015 at 07:50 PM.
    Precision in the wrong place is only a placebo.

  2. #42
    Boolit Grand Master

    MBTcustom's Avatar
    Join Date
    Feb 2011
    Location
    Arkansas
    Posts
    6,994

    A word on timing

    In case you hadn't noticed, consistent casting is all about temperature and timing, and if you control these things, you're going to be able to drop absolutely stuningly beutiful and consistent bullets session to session like clockwork.
    Speaking of clockwork, let me show you what I use to control my cadence, time my sprue freeze etc etc.
    If I can divide the cycle in 15, 30, 45, or 60 second increments, I much prefer to use my trusty Timex.
    Attachment 131923
    It works very well for casting because it is so large, it's easy to see.

    Unfortunately, often the temperature falls somewhere in between a 15 second increment in order to be just perfect, so I have a small digital egg timer I got at Walmart for situations like that.
    Attachment 131925
    Once set, it will count down the time to an alarm when the "start/stop" button is pressed.
    I use this by setting it so that when it beeps, I fill the mold, and as soon as the puddle freezes, I start it again and cut the sprue, empty the mold, shut the mold, wait for the beep, and repeat.
    This actually works quite well, although after hearing that beep about 200 times (and you with a rubber mallet in your hand the entire time) you really have to resist the urge to smash it to pieces by the time you're finished (price we pay for precision).

    The nice part about it is that you can lay it flat on the bench and press the button (even with a gloved hand) and you can keep your eyes on what you are doing, instead of on a watch face.
    I'm always looking to improve on this particular tool, so if anybody uses something like this that's a little less annoying, "I'm all ears" .

    The important thing is that since temperature and timing is the name of the game with consistent casting, you need to find a way to measure/control these two things, and the more you do, the better your results will be.

    One of the best parts of controlling these variables and knowing what works, is that it actually takes a considerable amount of pressure off you as the caster. You can get up and stretch, kiss the wife, spank the kid, kick the dog, answer the phone, smoke, spit, go to the washroom, or all of the above that a normal human needs to do from time to time, and in the midst of all that chaos, you can create perfectly consistent bullets all day long. (to say nothing of the fact that sometimes you need to add alloy to your pot and that takes some time to right itself.)
    Last edited by MBTcustom; 02-23-2015 at 08:25 PM.
    Precision in the wrong place is only a placebo.

  3. #43
    Boolit Master Hannibal's Avatar
    Join Date
    Sep 2013
    Location
    East of KCMO
    Posts
    2,213
    Quote Originally Posted by sgt.mike View Post
    Rick casted some tonight with a differant alloy ( which I need to get XRF'd I forgot what it was ) to see just how it would run.
    Well you know we have the weird snow and cold that is seasonally unusual I was in my shop casting the shop is uninsulated no heat cept the hot plate and lead pot. Little cool to say the least
    as I was using beewax to "refine" the alloy I had the door open. The wind was messing with the mold pretty badly I had 1.4 gr variance in the bell curve.

    Thinking that I need to drop the temp in the pot a bit. And pick a bit warmer day.... LOL I was able to save quite a bit though for mid-range velocity.
    Thank you for posting this. I've just had another 'Ah, Haa! ' moment.

  4. #44
    Boolit Grand Master

    MBTcustom's Avatar
    Join Date
    Feb 2011
    Location
    Arkansas
    Posts
    6,994
    Just a word on fluxing.

    There is great debate about this issue, and I don't care to have one here. This is just what I do to get consistency (as described by the bell curves posted earlier).
    Sawdust is the greatest flux ever discovered, and I give Glen Fryxel full props for his recommendation of it (although for the record, my father recommended it to me back in the early 90s as well)
    If there exists some goo or some stuff that burns that can be thrown in the pot, I've probably tried it over the last 15 years. My personal preference is that I smelt with sawdust, and cast very clean ingots. However, when dealing with a casting pot, I use good old fashioned beeswax.
    Now, I don't want to get into a debate about whether or not beeswax is a flux or not. My opinion is that my fluxing is taken care of at the smelting level. When I am at the casting bench, I do not care to have little black flakes of charcoal migrating down the walls of my pot and through the spout, and into my mold. This has happenes no matter how careful I am to prevent it. At this point, my thinking is that if I don't want little black flakes of charcoal getting into my mold, then I should quit piling that same substance 1" deep on top of the melt.

    Meanwhile beeswax has a very interesting way of reducing the surface tension of the alloy and it flows into the mold more consistently with beeswax present. This goes for the bottom pour pot as well. Ladle casting is especially appreciative of this age old trick. When using sawdust, the stuff is constantly sticking to the spout of the ladle, and the sides, and I ended up banging the ladle on the edge of the pot to clear all the dust that clings to it like greased cellophane.
    In contrast, when a small piece of beeswax is added to the melt, and stirred in with the ladle itself, the ladle comes up out of the melt smoking and clean as a whistle, and the silver stream runs out of the spout like mercury. More importantly, the bullets come out of the mold more consistent in weight and appearance, and that is what I am after.
    Bees wax in a BP pot works equally well, although if your pot is dry, it takes several treatments to really get the effect. The nice thing about beeswax, is that instead of creating dust that migrates down the walls of the pot to the spout, it does just the opposite. It actually encourages it to release its hold and lifts the crud up to the top of the pot and there it floats for you to scrape off and dispose of.

    Now it's true that once all the beeswax burns off and finishes outgasing, you no longer have a barrier to the oxygen, and you also have a very clean alloy which encourages oxidization. However, I don't really care about this because
    A. I can just add another piece of beeswax, and
    B. I'm not going to lose enough elemental constituents in 15 pounds of alloy over a period of 6 hours, to really effect anything.

    I have done quite a few XRF tests of alloy that was melted and scraped over long periods of time, and the only way you'll see a measurable reduction of tin or antimony in your pot is if you heat it and scrape it every day for a month without ever replenishing it. After a month of heating, scraping, and beeswaxing, your alloy will have been reduced in tin or antimony by a staggering .2%, although your entire pot level will have been reduced by a noticeable amount. The reason for this is that the tin and antimony that separate out of the mix take lead with them too. In fact, I XRF tested the silver sludge that floats on top of the melt, as well as the dross scrapings, and while it was indeed high in tin and antimony, it was even higher in lead. Actually it was surprisingly close to the alloy in the pot it came from.

    All of this tells me that when smelting, it is important to use sawdust because you are throwing several alloys together and you need them to blend perfectly. Sawdust is the best thing for this (although I throw beeswax in there with it) but once I am sure the alloy is blended well and it's time to cast bullets, the age old adage: cleanliness is next to godliness, seems to apply for me, and beeswax produces better bullets.

    All things considered, I have chased this goat all over Knob Hill and found it back in it's pen. Dad told me to flux with sawdust when smelting, and use beeswax in my pot as a casting aid when I was a mere lad of 14 years old, and I believe him to be 100% correct.

    The path to precision, accuracy and consistency of the two is as follows and never changes:
    Dismiss your preconceived ideas and biases (and everyone else's too while you're at it).
    Observe, measure, test, conclude, institute a change (one at a time), and repeat.
    Never ignore a facet of data that is available to you.

    Never disregard what the data tells you because someone else told you it doesn't matter (this happens in every area of my life. Most of the time I end up reinventing the wheel, but I have a thorough understanding when I'm done, and I can tell someone else why I do what I do.)

    This is just good general advice and it has carried me to the truth through all areas of my life from marriage to child rearing, to gunsmithing, to bullet casting, and I dare say, the results speak for themselves.
    When it comes right down to it, it either works for me or it doesn't. I am not willing to say something doesn't work without giving it a good honest effort, but when it fails to impress, I drop it and move on.
    Using this process, I have learned how to cast excellent bullets that are superb in appearance, and consistent in weight to the tune of +-.1 grains by weight, and I can do it with all the alloys in my shop. This thread is simply a tutorial of how I have accomplished that.
    I have posted pictures of the bell curves to attempt to back up what I am saying as the truth as it pertains to my situation, and I am trying to be as transparent as possible about the tools I use to accomplish this feat.
    It is my opinion, and mine alone, but I think it's possible others might be able to achieve the same level of proficiency in a shorter period of time, and if so, I am willing to help.
    This tutorial is also what I give to people that come to the shop to learn how to cast, and I encourage them to use these tools of exploration to find their own path to success. No one will fail if they remain true to themselves and keep their eyes open as they explore the art of casting excellent lead bullets, and I think I am even more excited to see their success, than they are.

    Thank you.
    Precision in the wrong place is only a placebo.

  5. #45
    Boolit Master
    Join Date
    Jul 2009
    Location
    Tennessee
    Posts
    2,794
    Very informative (and well written) thread, Thank You Tim. Question , I ladle pour and use a 10 pound melt, roughly how much beeswax would you use each time you add it while casting? I used to use wax but had changed to sawdust lust like when making ingots. Noticed just what you described in the last post. So , english pea size ball or more or ?? Again thanks
    “You don’t practice until you get it right. You practice until you can’t get it wrong.” Jason Elam, All-Pro kicker, Denver Broncos

  6. #46
    Boolit Grand Master

    MBTcustom's Avatar
    Join Date
    Feb 2011
    Location
    Arkansas
    Posts
    6,994
    I use a flat head screwdriver to break off a piece about this size.
    Attachment 132011
    Throw it in the melt and stir quite a bit to get the walls of the pot all coated and to help bring the crud to the surface. You'll be surprised how much trash you get.
    Just my 2 cents worth.
    Precision in the wrong place is only a placebo.

  7. #47
    Made in U.S.A.
    SwedeNelson's Avatar
    Join Date
    Mar 2005
    Location
    Provo, Utah
    Posts
    2,627
    Tim

    Next time try to stir your bee's wax in with a 3/4" round oak dowel about 10" long or so
    Works a lot like saw dust to flux with but not all the ash.
    "My father recommended it to me back in the early 80s as well"

    Bullet maker, maker
    Swede Nelson
    The expectation of evil is more bitter than the suffering -OR-
    More people die from worrying about getting ate by a bear then get ate by a bear.

  8. #48
    Boolit Grand Master

    MBTcustom's Avatar
    Join Date
    Feb 2011
    Location
    Arkansas
    Posts
    6,994
    Quote Originally Posted by SwedeNelson View Post
    Tim

    Next time try to stir your bee's wax in with a 3/4" round oak dowel about 10" long or so
    Works a lot like saw dust to flux with but not all the ash.
    "My father recommended it to me back in the early 80s as well"

    Bullet maker, maker
    Swede Nelson
    Well if the advice came from the guy who raised the best moldmaker in the USA, I guess I had better try it!
    Good to see you Al.
    Precision in the wrong place is only a placebo.

  9. #49
    Boolit Master
    Join Date
    Jun 2008
    Posts
    1,720
    About char making its way to the bottom of the pot from the surface, I have not had that happen so far as I have realized. I have had that problem when using pine spatula to scrape the pot and quickly went back to using a steel spat. I have quite a nice supply of beeswax and use it in the pot. I do not think the wax really gets into the alloy, I have to roil-up the alloy from the depth of the pot to expose it to the wax up on the surface; the wax is just too volatile and light to submerge.

    Again, Goodsteel, great info, and now, Swede has ne ready to slice off a spatula of red oak.

    prs

  10. #50
    Boolit Grand Master

    MBTcustom's Avatar
    Join Date
    Feb 2011
    Location
    Arkansas
    Posts
    6,994
    Quote Originally Posted by prs View Post
    About char making its way to the bottom of the pot from the surface, I have not had that happen so far as I have realized. I have had that problem when using pine spatula to scrape the pot and quickly went back to using a steel spat. I have quite a nice supply of beeswax and use it in the pot. I do not think the wax really gets into the alloy, I have to roil-up the alloy from the depth of the pot to expose it to the wax up on the surface; the wax is just too volatile and light to submerge.

    Again, Goodsteel, great info, and now, Swede has ne ready to slice off a spatula of red oak.

    prs
    Good information prs. Thanks for weighing in (pun intended).
    You are very right, the wax cannot get into the melt. It rides on the surface and between the lead and the wall of the pot, and when it outgases it brings the garbage to the surface.
    Out of curiosity, would you mind if I ask what pot you are using? It has crossed my mind several times that this might be a problem that is specific to the Lee pots. I would appreciate any additional information.
    I am hoping to invest in a RCBS lead pot this year but until then, I cannot make a comparison. This thread is just an explanation of how I have gotten consistency with the equipment I have available.

    Thank you.
    Precision in the wrong place is only a placebo.

  11. #51
    Boolit Master
    Join Date
    Jun 2008
    Posts
    1,720
    My pots are bottom pour Lee 20#, one came with the new style adjuster screw and another I have adapted with that. Another I picked-up and is on a shelf. I use a PID on the pot from which I cast and I have the other pot running a little hot to receive the spru and "pre-keepers" or "FLBs" (Funny Look'n Boolits). When the casting pot gets low I ladle lead from the reserve pot and then let new ingots melt in the reserve. My PID is set at 730F and I see that is in your sweet range. Iron molds, I run with PID at 700F as they are less cavities and hold heat longer. I rarely ladle cast and mostly use multi cavity molds. I have Swedes 68 clone with pins in aluminum and it is a favorite for sure. No problem with black specks when ingots are clean and no pine spatula.

    I
    When doing yearly inspections, and inspections before a long trip, removing the radiator cap and checking the coolant level at the cap when the engine is cold should always be part of your inspection. (If Honda was serious about owners doing regular bike inspections, they would have, and should have have found a way to make the radiator cap much more accessible.)[/QUOTE]
    Quote Originally Posted by 05nwl View Post
    Greg (and LarryM)
    Sorry if I came off like...a dipstick.
    I can see the value of pressure testing. If the cap fails closed the resultant over-pressure could damage the cooling system, maybe blow a hard-to-get-to hose or even break a radiator. If it fails open it may boil under hot conditions and expel coolant and I will probably see that it is puking.
    But to number 2., I think he probably had a bad thermostat. Anyway, my point is I think the dipstick (the one in the bike) can be a good indicator of coolant loss, a leak, and was intended to do just that.
    So, let's say I'm your average dipstick Goldwing owner (my wife would rate me a below average dipstick) and at my last coolant change interval, like a good boy, I had my system pressure tested and it tested OK and I filled it. I ride around for a few months and check the dipstick and it indicates abnormally low coolant, like none if I really have a leak (more than just evaporation from the bottle). I have not seen any indication of leaking. I add coolant. I ride around for awhile and check the dipstick and it indicates low again. Whala, I'm sure I'm losing coolant so I suspect I may have a leak on the pressurized side of the system. Now I check the cap and do a pressure test.
    The dipstick did its job for me. I use it regularly, only for its intended purpose of course.
    have in past done bell curves with boolits. I tended to get skewed curves with the central tendency at the heavy or correct weight and the long tail toward light samples. Makes sense to not have overly heavy samples unless the mold block faces get splattered (oops) or the sprue cutter gets loose to allow bases to protrude (the latter a peculiarity of Lyman molds when the little lead shot under the Allen screws begin to melt - and I replace with snips of copper wire).

    Carry on!

    prs

  12. #52
    Boolit Grand Master

    MBTcustom's Avatar
    Join Date
    Feb 2011
    Location
    Arkansas
    Posts
    6,994
    Wow, that's an excellent system prs.
    I confess, I've been thinking of using my Lee 20 as an alloy prep when I get the RCBS. Now that I see your recommendation of doing just that, I think I will!

    For the record, regarding the bell curves, I saw a very interesting trend while I was creating them. If the base of the Christmas tree swung towards the heavy side, then the alloy temperature was too hot. If it swung towards the light side, the alloy temperature was too cool.
    When the curve is perfectly centered on the long peak, the alloy temperature is right where it needs to be for optimum consistency.

    Also, something I noticed that is very telling. No matter what the temperature of the alloy or the mold, no matter how jacked up my casting process was, no matter how much my bell "curve" looked more like a worn out hair brush, one thing remained constant through all the tests: The longest line of bullets was always the same weight.
    As I dialed in my process, that long line got longer and longer till it was just a single string of bullets, but the curious thing was that the weight of the bullets in that longest line never changed more than .1 grains. It was very obvious that the mold wanted to cast bullets of that exact weight, and there was something (actually quite a few somethings) I was doing that prevented all the bullets from coming out that exact weight.
    In fact, the only thing I could do to change that constant was to switch alloys. As long as the alloy was the same, that mold was going to try to throw bullets in that long line, and it was up to me to figure out what I was doing to prevent it.
    That was one fascinating discovery.
    Precision in the wrong place is only a placebo.

  13. #53
    Banned

    Join Date
    Dec 2007
    Location
    soda springs Id.
    Posts
    28,088
    paint stir sticks are over 10" long and shaped nicely for scraping the sides and bottom of a casting pot.
    ohh they also hand them out for free at the hardware store and the lowes...

  14. #54
    Boolit Master Hannibal's Avatar
    Join Date
    Sep 2013
    Location
    East of KCMO
    Posts
    2,213
    I have tried paint stir sticks, with less than stellar results. Matter of fact, it was the closest I have come to a visit from the tinsel fairy. If it works for you, then you certainly have found an economical solution. It doesn't get much cheaper than free, after all. But I am going to have to stick with stirring paint with paint stir sticks and bees wax in the casting pot. Just my $.02.

  15. #55
    Boolit Buddy

    Join Date
    Dec 2013
    Location
    A State of Confusion
    Posts
    258
    Tim,

    Thank you very much for sharing and illustrating the techniques that lead to consistency. I feel as a new to casting loader, that this is invaluable information and will be a key part of my process as I learn the tricks to produce consistent lead projectiles.

    I do much as you, after much research (and a little practice), using sawdust for fluxing when converting wheel weights into ingots, then switching to beeswax for the Lee bottom pour pot. I tried the sawdust routine in the casting pot, but switched to beeswax and I won't look back! The difference is noticeable and I think the beeswax is much better suited to reducing the casting alloy and maintaining a consistent alloy without loosing the key ingredients.

    I will utilize your weight sorting and curve to see how my consistency is gaining over time. Thanks again for sharing your research with us! :hatsofftoyou:

  16. #56
    Boolit Grand Master


    Join Date
    Apr 2005
    Location
    Omaha, Ne.
    Posts
    5,422
    A super thread! Should be a sticky!
    1Shirt!
    "Common Sense Is An Uncommon Virtue" Ben Franklin

    "Ve got too soon old and too late smart" Pa.Dutch Saying

  17. #57
    Boolit Grand Master

    MBTcustom's Avatar
    Join Date
    Feb 2011
    Location
    Arkansas
    Posts
    6,994
    Quote Originally Posted by 1Shirt View Post
    A super thread! Should be a sticky!
    1Shirt!
    Thank you very much 1Shirt. That means a lot coming from a member with your experience level.

    If applied, this method of self training can make an inexperienced caster progress very quickly to a point of achieving impressive proficiency. From that point, the caster can observe, measure, test, and adjust his/her method to achieve any result they wish. No matter what each caster's personal requirement for their bullets might be, we all share three common goals: accuracy, repeatability, and consistency.
    The reason why I encourage each caster to provide themselves with evidence, and proof of the consistency they are capable of, is because if progress is desired, you must be progressing from one point to another. Without some method of monitoring progress accurately, no discerning person could be sure they have actually progressed.

    Concerning shooting and loads, we have targets that will give us pretty accurate feedback as to our progress if large enough sample sizes are taken and measured in MOA with consistency being the ability to reproduce those results over a range of shooting sessions and yardages, but I have found the casting pot to bring just too many variables into the equation to make a determination using a target in conjunction with the previous two objectives. I wanted a way to "shoot a target" with my lead pot on the bench, without the detrimental influences of errors with the rifle or the loads.

    Now I can depend on the accuracy of the bullets cast and proved at the bench, and the range can be used to tack down load data and issues with the rifle, along with personal skill and riflemanship.
    Precision in the wrong place is only a placebo.

  18. #58
    Boolit Buddy

    Join Date
    Dec 2013
    Location
    A State of Confusion
    Posts
    258
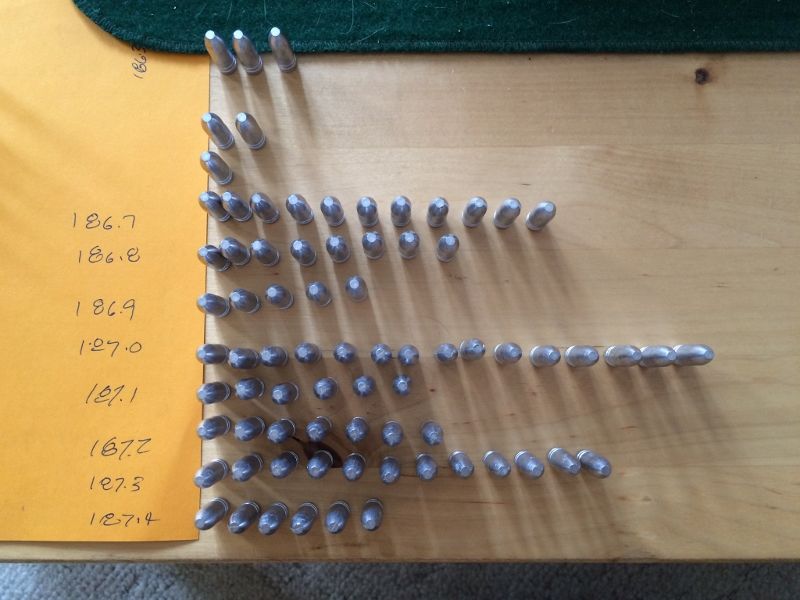
    Okay, decided to apply your sorting method to a cast from the other day when it broke the 30F mark here and I could handle the garage. Ran some 98/2 COWW in my new Noe 30 Hunter mold (188gr).

    First run was terrible, they all went straight back to the pot, so I regrouped, upped my Lee pot temp and went at it again... much better results.. this seemed to need more heat in the alloy, also upped my hot plate temp a little to get the mold hotter to begin with. Saved most all of these casts, less about 10% that got sorted at the bench when they cooled (the early casts, etc.. (obvious wrinkled or not filled out)) and remelted.

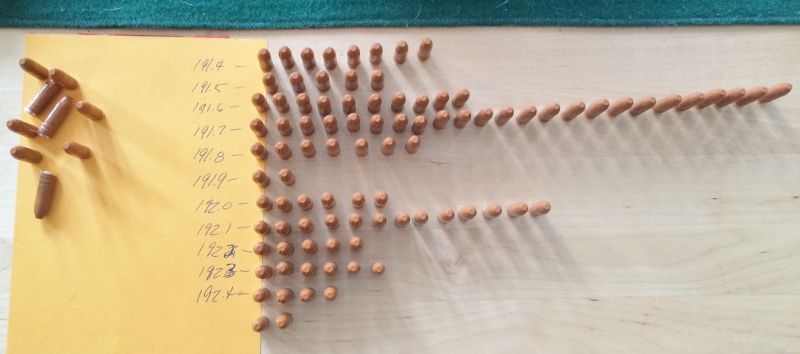
    I took about 100 of them (cast about 190 total after rough sorting) and DTPC'd them and added gas checks/sized.

    These are the other leftover saves that didn't get touched yet..


    Decided to do the same for the finished boolits, expecting more variance, as they are DTPC'd, which is not as consistent a coat weight, and as was expected...


    Now a couple of comments, as I see that I clearly have some inconsistencies to overcome yet with my process. I did notice when starting to cast with the new Noe mold, that along the way the sprue plate was pretty loose.. too loose. So I took a break and adjusted the sprue plate to get it back right again and resumed. I think this explains some of the variance in the cast weight spreads (the heavier cluster of weights).

    I also had at one point, the sprue literally wanting to fall off the mold when I turned it over after the sprue frosted, causing some lights due to the slight removal of sprue from the base of the boolits when that happened. I adjusted my technique a little to eliminate that.

    I also ran into issues with seating the gas checks and shaving a little lead from the base on occasion, I suspect as a result of my DTPC, which adds a bit more to the boolit base diameter. I am going to run a batch with Hi-Tek coating and see how they work in comparison. I would prefer to coat these over lube (though a tumble lube is within my capabilities), as I don't have a 'lube die' and don't really want to go down that road at this point in my early start and... they will be running in a 308 AR, so I want some coating to protect them and prefer to not have lube gumming up the works in the rifle over time (but that could be misconception too).

    I also have not been 'priming' the pot before starting my cast, which I am sure has some significant effects, especially in the freezing cold weather we are enduring and in my unheated garage, so next time around, I will add that step into the process and see if it helps my consistency as it seemed to help the OP.

    Still learning... and experimenting... and smiling all along the way...

  19. #59
    Boolit Grand Master

    MBTcustom's Avatar
    Join Date
    Feb 2011
    Location
    Arkansas
    Posts
    6,994
    Judging by your bell curve above, I see two things going on. First, I would suggest (assuming the exact same casting conditions) you try running your pot 25 degrees cooler.
    Second, it looks like you're mold temperature was pretty erratic?
    Third, your loose sprue plate was definitely giving you grief.

    However, remember the most important rule of casting and shooting: Change only one thing at a time!
    You have too much going wrong to really tack down what the problem is, but you can also take your pick from the very likely culprits. Just pick one, control it, and observe the difference.
    Any time you run across something that has a wide range in which control may be exercised, you can rest assured that there is a sweet spot in there, so the first objective is to gain control, but then you experiment with that control to find the best place to put it (as I was saying about alloy temperature and timing).

    BTW, Awesome PC job on those bullets! They look awesome. I have not seen that color used yet.
    You bring a whole different facet to the table with your PCed bullets. I wonder if it would be possible to duplicate the bell curve after PC? Very intriguing.
    Precision in the wrong place is only a placebo.

  20. #60
    Boolit Buddy

    Join Date
    Dec 2013
    Location
    A State of Confusion
    Posts
    258
    Quote Originally Posted by goodsteel View Post
    Judging by your bell curve above, I see two things going on. First, I would suggest (assuming the exact same casting conditions) you try running your pot 25 degrees cooler.
    Second, it looks like you're mold temperature was pretty erratic?
    Third, your loose sprue plate was definitely giving you grief.

    However, remember the most important rule of casting and shooting: Change only one thing at a time!
    You have too much going wrong to really tack down what the problem is, but you can also take your pick from the very likely culprits. Just pick one, control it, and observe the difference.
    Any time you run across something that has a wide range in which control may be exercised, you can rest assured that there is a sweet spot in there, so the first objective is to gain control, but then you experiment with that control to find the best place to put it (as I was saying about alloy temperature and timing).

    BTW, Awesome PC job on those bullets! They look awesome. I have not seen that color used yet.
    You bring a whole different facet to the table with your PCed bullets. I wonder if it would be possible to duplicate the bell curve after PC? Very intriguing.
    Thanks Tim for your feedback. I agree, there are a few issues that I need to master yet, primarily cadence and learning the proper temps for each mold/boolit design for the mold and alloy. My first batch was on the cool side, both alloy and mold (I think) as I was getting wrinkles and incomplete fillout.

    Correcting the sprue plate made a difference and I know that was hurting me in the early stages of casting with this new mold as the plate loosened up.

    I will try dropping my alloy temp a bit. My first batch was obviously too cool and I upped the alloy to 750, perhaps a bit high, but my fillout was good, so I went with it. I was getting a little frosty, but my fillout was good, the sprue frosting time seemed good, so that's what I went with on that batch. I also think that priming the spout will help in these cold Mid-Atlantic temps we have been enduring of late, so the spout cooling (along with refining my cadence) was definitely an issue.

    I understand tacking one variable at a time, I have been a troubleshooter for most of my adult life..

    I am not yet using a pyrometer on my mold, but that would be easy enough to do, just need to drill a hole. I will look into that this week. I do use a hot plate to preheat the mold, but understand that rhythm in casting is equally important and I need to refine that a bit as well.

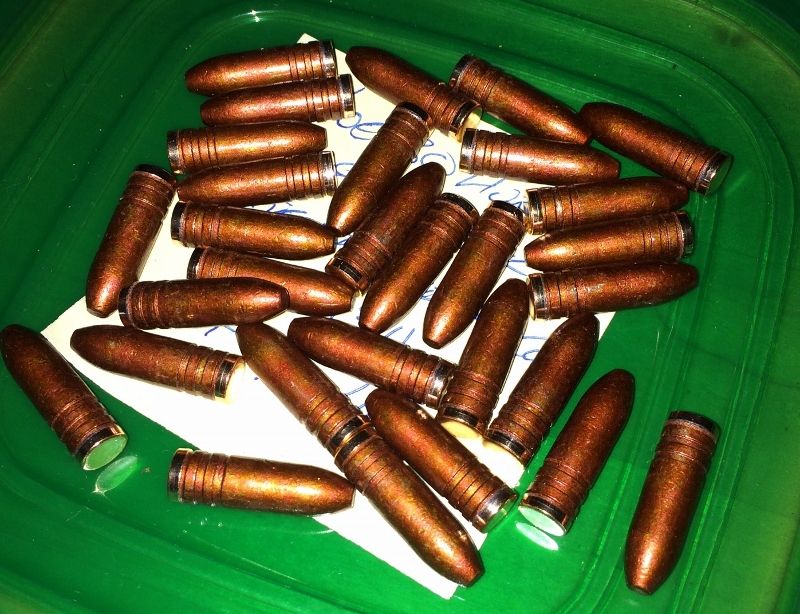
    The DTPC is probably not going to exactly duplicate the bell curve, as compared to ESPC (which I don't do.. yet.. lol), but with the Hi-Tek, I may be very close. I will try that and post the results next batch around. That was Smoke's Orange Brown on those and this is Hi-Tek's Red Copper on the batch that was uncoated this morning...


Posting Permissions

  • You may not post new threads
  • You may not post replies
  • You may not post attachments
  • You may not edit your posts
  •  
Abbreviations used in Reloading

BP Bronze Point IMR Improved Military Rifle PTD Pointed
BR Bench Rest M Magnum RN Round Nose
BT Boat Tail PL Power-Lokt SP Soft Point
C Compressed Charge PR Primer SPCL Soft Point "Core-Lokt"
HP Hollow Point PSPCL Pointed Soft Point "Core Lokt" C.O.L. Cartridge Overall Length
PSP Pointed Soft Point Spz Spitzer Point SBT Spitzer Boat Tail
LRN Lead Round Nose LWC Lead Wad Cutter LSWC Lead Semi Wad Cutter
GC Gas Check